 Italiano

A performance problem (and a solution!)
There is a saying among those who work with code”When it comes to code optimization, never do code optimization!” of this same saying there is a following version that states “As far as code optimization is concerned, don’t do code optimization NOW”. The idea behind these sayings is to not waste time and effort doing code optimization when, most likely, you have not yet identified whether you need it and whether what you are optimizing is crucial.
When it comes to code optimization, never do code optimization
A typical example is minifying javascript and css files, zipping the html code of a page to reduce its size, but then someone comes and publishes an 80 Mega non-optimized image. So even if you saved 5Kb of files, the 80Mega image destroys everything.
As regards the radio website, www.radiocittaperta.it, I have never found myself in the situation of having to optimize something: the dedicated hosting, the caching solutions implemented within the CMS in use, the manageable traffic, have never shown bottlenecks of the case.
However, there is one feature that has given us a hard time: the site updates in real-time the title of the song on air, the image associated with that song, and the program on air. This information is spread across different sources: the title comes from the streaming provider, the broadcast program is stored on the site’s database, and the image is saved on the site’s hosting by taking it from Spotify’s API. To ensure that the information is constantly updated, the site (but also the app) does is call an endpoint to receive updated information every 3 seconds. I guess there are more modern and optimized ways to do this too, but good old polling has worked for years and I know it quite well.
The problem of calling an API every 3 seconds from the browser is not so much in the call, but this call brings with it the whole context including the database and, for each call, a query is made to know which program is on air. It’s not deadly, but if there are several of us on the site, and everyone is still listening and seeing the page, this means that for each user, every 3 seconds, a connection is pulled up and a query is made. And this isn’t very good, it slows down the site and (sometimes) makes it inaccessible with an error like “MOD_FCGID: CAN’T APPLY PROCESS SLOT PHP“
How is this problem solved?
There are numerous solutions: you could think of using a fast database, for example, a NoSQL, or creating an optimized table on the MySql database, but I preferred to use the knowledge I acquired during a conference in Germany. There I listened to a talk in which it was said that, despite a general mistrust, the use of text files is often the best solution and also the fastest. This is because hard drives and ways of accessing information kept as files can also be very, very fast. For this I set up the creation of a local cache file, with the information saved as text, the information is formatted like this:
{
title: "KATZENJAMMER con MIRO BARSA",
thumb: "https://www.radiocittaperta.it/wp-content/uploads/2020/09/KATZENJAMMER-IMAGE.png",
show_podcastfilter: "katzenjammer",
url: "https://www.radiocittaperta.it/shows/katzenjammer-con-miro-barsa/",
day: 4,
start: "10:00",
end: "12:00",
category: "0",
song: "Pink Floyd - Whish you were here",
cover: "https://www.radiocittaperta.it/wp-content/uploads/2020/09/wish-you-were-here.png"
}
How do you handle updating the title or program on air?
For the title the thing is quite simple: when the speaker updates the title, then the cache file on the site is also updated. This is because the title of the song on air does not come from a magical place, but is inserted manually by the speaker on duty, at each song change. For the program on air, however, I used WordPress cron, which runs the query every 15 minutes and updates the file with the real data. 15 minutes is a reasonable time and then, basically, the idea is that broadcasts change at the hour o’clock, or (at most) on the 30th minute. So every 15 minutes is more than enough.
How do you read the information?
This is very easy, with an ajax call directly from the site (or with a call from the app) the static file is requested, for example like this:
var proxyURL = "https://www.radiocittaperta.it/mystaticfile.json";
jQuery.ajax({
     type: "GET",
     cache: false,
     url: proxyURL,
     async: true,
     dataType: "json",
  success: function(data) {
      applyTitle(data)
  },
  error: function(e) {}
})
I won’t go into the merits of the basic applyTitle function, which takes care of updating the title, image, and broadcast.

How to listen to a live broadcast show on Spreaker, with a raspberry and a stereo
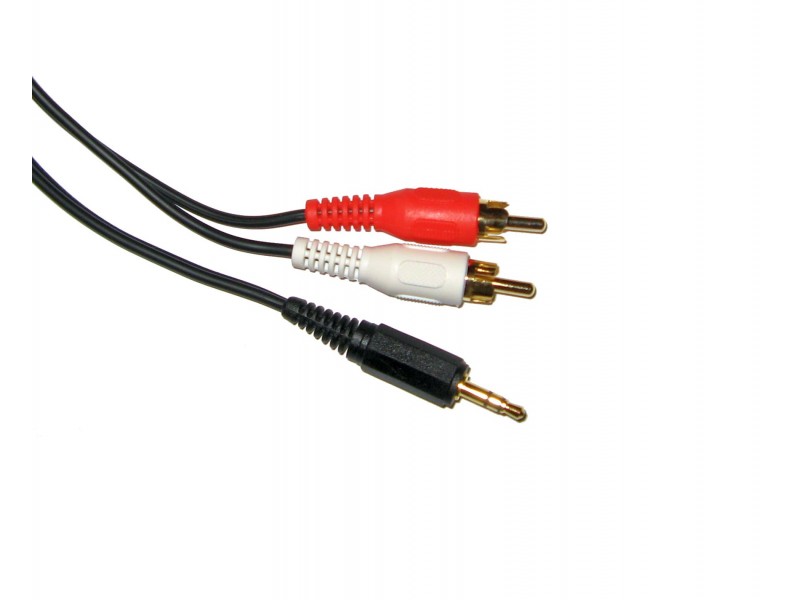
I was used to listening to a radio show with two hosts: Sandro “Fuffo” Bernardini and Nicole Fondato. Then, for various reasons, they stopped broadcasting and started making a podcast on Spreaker. From 8 to 9 it goes live and then you can listen to it like any normal podcast. So I decided to use my Raspberry to listen to the show live every morning. The Raspberry is connected to my amplifier with a 3.5mm jack and a cable, like the one in the picture.
I wrote a bash script that gets the latest show episode’s ID using the Spreaker API. The script saves the response to a variable rawresponse then, if the show is live, It retrieves the streaming audio URL. That URL does a 302 redirect towards the real location of the file, probably on a CDN, and this latest value of the URL is saved in a variable, then played via the MPlayer program (included in Linux)
#!/bin/bash
rawresponse=$(curl -s 'https://api.spreaker.com/v2/shows/5913168/episodes?sorting=newest')
islive=$(echo $rawresponse | jq --raw-output '.response.items[0].is_on_air')
if [ $islive == "true" ];
then
    urldef=$(echo $rawresponse | jq --raw-output '.response.items[0].playback_url')
    url=$(curl -w "%{url_effective}\n" -I -L -s -S $urldef -o /dev/null)
    mplayer $url > /dev/null
fi
Finally, using Linux crontab, every day from Monday to Friday at 8 o’clock (actually a few minutes earlier, at 7:59) it starts playing and the call stops playing at 9:20 (it stops it brutally via pkill, but it works, and therefore ok).
# plumcake start
59 7 * * mon-fri /home/pi/plumcake-stereo.sh
# plumcake stop
20 9 * * mon-fri pkill mplayer

Streaming to icecast/shoutcast from linux
Audio Streaming technology can be of different protocols but mostly Icecast and Shoutcast, while this post does not want to highlight the pro and cons of one versus the other, we want to share a solution for streaming clients running in Linux, via a terminal.
Linux is an operating system not easy, but with a lot of features and solutions. And it’s free so it is worth spending a little bit more time (I mean hours and days) trying to find a good solution for your needs. My need was a client streaming mp3 audio from a server without a user interface to an Icecast server and to a Shoutcast server.
I need a Linux client that can stream a playlist of files to Icecast and/or Shoutcast
There are multiple solutions that can do this:
- Ezstream is a Linux client, but it works only with the Icecast server
- Liquidsoap can handle both Icecast and Shoutcast, but the installation process can be tricky (more tricky than I expected) on a CentoOS machine
- Darkice can stream both Icecast and Shoutcast but does not allow the stream of a playlist
- mpd/mpc solution can be done, but it’s not so easy to configure
- Butt is a graphical tool and the terminal command can not do everything we need. And it doesn’t allow the streaming of a playlist
But I have some constraints: first of all the Operating System is a Linux CentOS distro, and this can not be changed. Then I need something that can handle a playlist of files, in fact, my use case is the summer/holiday stop a web radio (https://www.radiocittaperta.it where I have also a show Katzenjammer). The files are the podcast of all the shows recorded during the year, and the server is the computer where the website is.
So after digging, searching, and googling, I’ve found that the perfect and easiest solution is to use VLC. VLC is a well-known software for playing almost any kind of files but maybe not everyone knows that it can be used also to stream to an Icecast or Shoutcast server and, also, that can be used without a user interface. So here is the command line used to stream.
cvlc --color dshow://dshow-adev="" "/path/playlist.m3u" --sout-keep --sout "#std{access=shout{name=your radio name,description=your radio description,url=https://www.yourwebsite.com,mp3=1,bitrate=128},mux=mp3,dst=source:admin@your-icecast-host:your-icecast-port/your-endpoint}"Where:
cvlc is the headless version of vlc binary
playlist.m3u is the playlist of files
looploop the playlist when last file ended
sout-keep it means “do not stop after a file is played (continuously play)
name=your radio name is your radio name
description=your description your radio description
url=https://www.yourwebsite.com a website, if your radio has one
mp3=1 this is needed if you want to stream mp3 files
bitrate=128 this is the bitrate of the stream
dst=source:admin@your-icecast-host:your-icecast-port/your-endpoint these are all the host, port, endpoint, username and password of your icecast server.
This will simply stream to a server, suppose it is an Icecast server, so if you also want to stream to an icecast server you should double this command but, lucky for us, there is a more advanced command that can do this for us:
/usr/bin/cvlc --color dshow://dshow-adev="" "/home/admin56306114/playlist.m3u" --sout-keep --sout '#duplicate{dst=std{access=shout{name=your radio name,description=your radio description,url=https://www.yourwebsite.com,mp3=1,bitrate=128},mux=mp3,dst=source:admin@your-icecast-host:your-icecast-port/your-icecastcast-endpoint},dst=std{access=shout{name=your radio name,description=your radio description,url=https://www.yourwebsite.com,mp3=1,bitrate=128},mux=mp3,dst=source:admin@your-shoutcast-host:your-shoutcast-port/your-shoutcast-endpoint}}' > /dev/null 2>&1 &
> /dev/null 2>&1 & it means: do this in the background and do not bother me with useless log lines!
Thanks to the duplicate option we can send the same stream to multiple servers. Options and values are easy to understand and configure.
Twitch streaming from webradio stream
Twitch is a video streaming service, mostly used by gamers, that can be used also for another purpose. As you may already know, I’m a Digital Streaming Specialist in a web radio radiocittaperta.it. Can Twitch be used for a web radio or radio? How can a web radio use the Twitch video functionalities?
There are multiple radio and web radio that use Twitch to stream their content, mostly they use some webcams in the studio and add the radio streaming audio to the video. This looks like a TV radio, like the one that you can find on TV. Technologies can achieve the same result on Twitch as the one on TV with fewer expenses. Twitch is free, the streaming software can be free (OBS is a free software to do it), you need to buy a camera(s) and some video acquisition hardware but you can arrange these things with the budget you have.
Additionally, This is the first significant streaming agreement we have seen in a long time. Following the shutdown of Microsoft’s Mixer platform, streaming services’ competition to sign the biggest talents waned. However, Kick is now officially putting their money where their mouth is in order to obtain the best talent available as they enter the fray as a real competitor to Twitch and YouTube. Since xQc launching Kick a few months ago, the platform has continuously mocked Twich and positioned itself as being more creator-friendly. It promises to give streamers more control over the direction the network takes and offers larger income splits with them. Links to a cryptocurrency-based casino abroad, however, have made some people wary about utilizing the app.
If you don’t have a budget at all, and you don’t want to add a real video taken from a camera to your web radio audio streaming, you can create a digital video with the following steps. The idea is to:
- Use a static image
- Add some dynamic content, for example, some video created directly from the audio source
- Add the streaming audio
You may think that you need software always open on a computer but there is a better solution: use ffmpeg to do this and let ffmpeg run in background on a computer. I’ve already written about ffmpeg (here, here, and here) and some of the function it has. With this solution, you can run it on a computer also used for something else, on a server, or also on a RaspberryPi connected to the internet. And this is very cool stuff!
- twitch key, it looks like live_238476238546_234jhgfuowgsjdhbfwsDFSdgbjsbv
- the audio stream https://my.audio.stream:port/stream
- a static image /somepath/mystaticimage.jpg
then just run this command
ffmpeg -loop 1 -f image2 -thread_queue_size 256 -i /somepath/mystaticimage.jpg \
-thread_queue_size 256 -i https://my.audio.stream:port/stream -re \
-nostdin \
-f lavfi -i aevalsrc="sin(0*2*PI*t)" \
-vcodec libx264 -r 30 -g 30 \
-preset fast -vb 3000k -pix_fmt rgb24 \
-pix_fmt yuv420p -f flv \
-filter_complex \
"[1:a]showwaves=s=960x100:colors=Red:mode=cline:rate=25:scale=sqrt[outputwave]; \
[0:v][outputwave] overlay=0:510:shortest=1 [out]" \
-map '[out]' -map '1:a' -c:a copy -y \
rtmp://live-ber.twitch.tv/app/live_238476238546_234jhgfuowgsjdhbfwsDFSdgbjsbv \
-loglevel quiet 2> /dev/null &
some notes on this command:
-
set where the waveform is printed, 510 is “at what height” you can play with that value to move upper or lower the waveform.[0:v][outputwave] overlay=0:510:shortest=1 [out]" -
is the waveform creator. There is the color and how the waveform should be printed, check the ffmepg documentation for other configuration"[1:a]showwaves=s=960x100:colors=Red:mode=cline:rate=25:scale=sqrt[outputwave]; -
is to put the command on background-loglevel quiet 2> /dev/null &
And this is the final result (some seconds)

Real time detect silence from audio input in Linux
As a
The current issue at hand is “how to understand that the web radio is streaming, when the stream is silent?”
understand that the web radio is streaming, but the stream is silent
How can this happen? Web radio streaming is a chain of multiple parts, both analog and digital, and it can happen that some of them are silent, while others are working as expected. For example, suppose we have a computer working as our streamer; it’s sending the audio input grabbed from a sound card directly to a streamer server. Even if the internet works, there’s connection, password is known and host is ok, there is no way to understand if the audio grabbed is silent or not. This results in audio streaming that is up-and-running, but not producing audio (or perhaps some white noise can be heard).
If the input cable is detached, if the audio source is turned off, or if the mixer fader is completely faded out instead of being at top volume, all these situations may lead to silent audio that goes through the streaming chain. The optimum solution for this is something that real-time monitors the input audio, checks if there are at least X seconds of silence and, if this happens, starts some procedures that can be:
- start some playlist so that the audio is no more silent
- send an e-mail and/or an alert to someone
Also, when the audio input is no more silent (a super smart radio speaker has moved the mixer fader to the correct position, for example…), this software needs to stop playing the playlist. It must run forever, it must restart if it’s stopped, and it must run at boot time. So let’s start with something that I’ve found: Python hassounddevice that do what we need to do.
Sounddevice with Python
I’m not so used to Python, but it seems very easy to understand, easy to use, easy to modify and super powerful. I’ve started from this thread with this code snippet
# Print out realtime audio volume as ascii bars

import sounddevice as sd
import numpy as np

def print_sound(indata, outdata, frames, time, status):
    volume_norm = np.linalg.norm(indata)*10
    print ("|" * int(volume_norm))

with sd.Stream(callback=print_sound):
    sd.sleep(10000)
that shows some bars from the audio input level, with some modifications, a chain of “if”; I’ve modified the script so that it writes to a file when X silent samples are found. Silent is defined as “a level under the threshold, th, value.
#!/usr/bin/env python3import numpy as np import sounddevice as sd import datetime duration = 10 #in seconds th = 10 sec = 0 maxNumberOfSilent = 4000 isSilent = True logfile = open("soundlevel.log", "a") def audio_callback(indata, frames, time, status): global sec global isSilent global logfile dateLog = datetime.datetime.now().strftime("[%Y-%m-%d %H:%M:%S] ") volume_norm = np.linalg.norm(indata) * 10 #print("|" * int(volume_norm)) #print(volume_norm) if volume_norm < th: sec += 1 else: sec = 0 if (sec > maxNumberOfSilent and not isSilent): isSilent = True logfile.write(dateLog+"Silent for "+str(maxNumberOfSilent)+" samples\n") logfile.flush() #print("Silent for "+str(maxNumberOfSilent)+" samples") elif (sec == 0 and isSilent): isSilent = False logfile.write(dateLog+"Music\n") logfile.flush() #print("Music") stream = sd.InputStream(callback=audio_callback) with stream: while (True): sd.sleep(duration * 1000)
After some more research, I’ve found a class to send e-mails using a Gmail account:
import smtplib, ssl

class Mail:

    def __init__(self):
        self.port = 465
        self.smtp_server_domain_name = "smtp.gmail.com"
        self.sender_mail = "........"
        self.password = "........"

    def send(self, emails, subject, content):
        ssl_context = ssl.create_default_context()
        service = smtplib.SMTP_SSL(self.smtp_server_domain_name, self.port, context=ssl_context)
        service.login(self.sender_mail, self.password)

        for email in emails:
            result = service.sendmail(self.sender_mail, email, f"Subject: {subject}\n{content}")

        service.quit()


if __name__ == '__main__':
    mails = input("Enter emails: ").split()
    subject = input("Enter subject: ")
    content = input("Enter content: ")

    mail = Mail()
    mail.send(mails, subject, content)
To put everything together, I’ve created a system that sends an e-mail when the sound is silent:
#!/usr/bin/env python3

import numpy as np
import sounddevice as sd
import datetime
import smtplib, ssl

th = 10
sec = 0
maxNumberOfSilent = 10000
isSilent = True
logfile = open("soundlevel.log", "a")
to_addresses = ("myemail@mail.com",)


class Mail:

    def __init__(self):
        self.port = 465
        self.smtp_server_domain_name = "smtp.gmail.com"
        self.sender_mail = "....."
        self.password = "...."

    def send(self, emails, subject, content):
        ssl_context = ssl.create_default_context()
        service = smtplib.SMTP_SSL(self.smtp_server_domain_name, self.port, context=ssl_context)
        service.login(self.sender_mail, self.password)

        for email in emails:
            result = service.sendmail(self.sender_mail, email, f"Subject: {subject}\n{content}")

        service.quit()

mail_client = Mail()
def audio_callback(indata, frames, time, status):
   global sec
   global isSilent
   global logfile
   dateLog = datetime.datetime.now().strftime("[%Y-%m-%d %H:%M:%S] ")
   volume_norm = np.linalg.norm(indata) * 10
   #print("|" * int(volume_norm))
   #print(volume_norm)
   if volume_norm < th: sec += 1 else: sec = 0 if (sec > maxNumberOfSilent and not isSilent):
       isSilent = True
       logfile.write(dateLog+"Silent for "+str(maxNumberOfSilent)+" samples\n")
       logfile.flush()
       mail_client.send(to_addresses,"Audio is silent",dateLog+" audio is silent")
       #print("Silent for "+str(maxNumberOfSilent)+" samples")
   elif (sec == 0 and isSilent):
       isSilent = False
       logfile.write(dateLog+"Music\n")
       logfile.flush()
       mail_client.send(to_addresses,"Audio back to normal",dateLog+" audio back to normal")
       #print("Music")

stream = sd.InputStream(callback=audio_callback)
with stream:
   while (True):
      sd.sleep(10 * 1000)
Podcast player for web radio site
As a hobby, I’m the “software handyman” in a web radio (also a speaker to be honest). In my spare time, I try to find solutions and cool stuff for all the digital problems related to this activity. It could be something that needs to be automated or some cool stuff on the website. This time, despite the fact that I’m not a good UI/UX, I’ve tried to improve the podcast player on the website. The default web player of WordPress is not that bad, but experimenting is something that I like to do and, after all, none will be killed by a bad player experiment on a web radio site self-financed by its speaker. So I’ve seen some cool players with a waveform on it and I’ve spent time to figure out how these can be included.

Default worpdress player
First Implementation of a new podcast player
After a first implementation, I found version 1 of this new player not-so-dynamic as I’m expecting. And more it also required some additional computation and files (a static file representing the waveform peak).

First Implementation podcast player
Second iteration of a podcast player
So I’ve found a new super dynamic player, in javascript. But it gave me some problems related to the “touch event” needed by the iPhone users to start the sound. After some months of figuring out how to solve it, I finally found a way of making it work.
Second implementation podcast player
It’s not perfect, still can be done better and maybe there are bugs around it but what I want to highlight is the fact that I’ve spent a lot of my free time finding a better solution (better means “better to me”) and solving issues, problems, edge cases, code limitations. See this recap video:
I’ve had the chance to do this because there is no money, neither human life involved and, basically, because this is a hobby. The possibility of experimenting in a safe environment made the difference and gave me also a vision of what are the other different skills and people involved in the development of a software solution: what could be the problem for a UX, what could push to add a new solution based also on time needed to do it.
My advice is to find space to explore and make mistakes in your workplace or outside your workplace. If you have time take a look at the player, at the website and, if you have a lot of time and you want to listen to an Italian web radio show about technology, space and similar stuff with a lot of music, my show it’s called “Katzenjammer” every Monday, starting at 20:00 Europe/Rome time zone.
There are podcasts as well 😀
Maybe I’ll share some tech details and code in a future post, anyway feel free to contact me for details or questions
Managing a web radio streaming provider
If you manage a Web Radio, if you are an IT consultant, or you’re just the “one of the tech guys” behind the scenes of such a radio, keep in mind the following suggestions. There could be some part of the web integration with your site that may result in future problems or a lot of work. Most of these problems are related to third-party services that you may or may not use, so let’s analyze some of them.
Streaming services
If you manage a Web Radio, you already know that you need a streaming web service in order to make people listen to your streaming audio. Unless you select an “all-in-house” solution, where you have a server with your website, your streaming server, and also podcast spaces, you probably rely on some third-party streaming services. This is also convenient from an economical point of view, because streaming servers can be very cheap, and some of them also come with an una-tantum solution (you paid once and only once). This basically means that your website has an url
https://www.myradiowebsite.comWhile your streaming service has a different url, maybe something like this
https://stream.thirdparty.org:8021/streamWhile this is a good solution and it works nicely without any problem, please consider that your streaming url (https://stream.thirdparty.org:8021/stream) may be used in multiple places: your website is one of them, but also your mobile app, your other integration with other websites, other webradio aggregator websites and so on.
The problem: streaming url
When you use a streaming server provider, this basically means you are coupled to a streaming url and if you want to change your streaming server provider, you need to update everything with your new streaming url: your website, your mobile app, the webradio aggregator website (eg. Tunein). More than this, if you need more listeners, the only way of doing this is to pay your streaming server provider for an upgraded plan.
The solution: a redirect proxy
The solution is to set up a simple redirect that can be easily manageable in-house. The redirect should add a streaming URL owned in your website, so something like this:
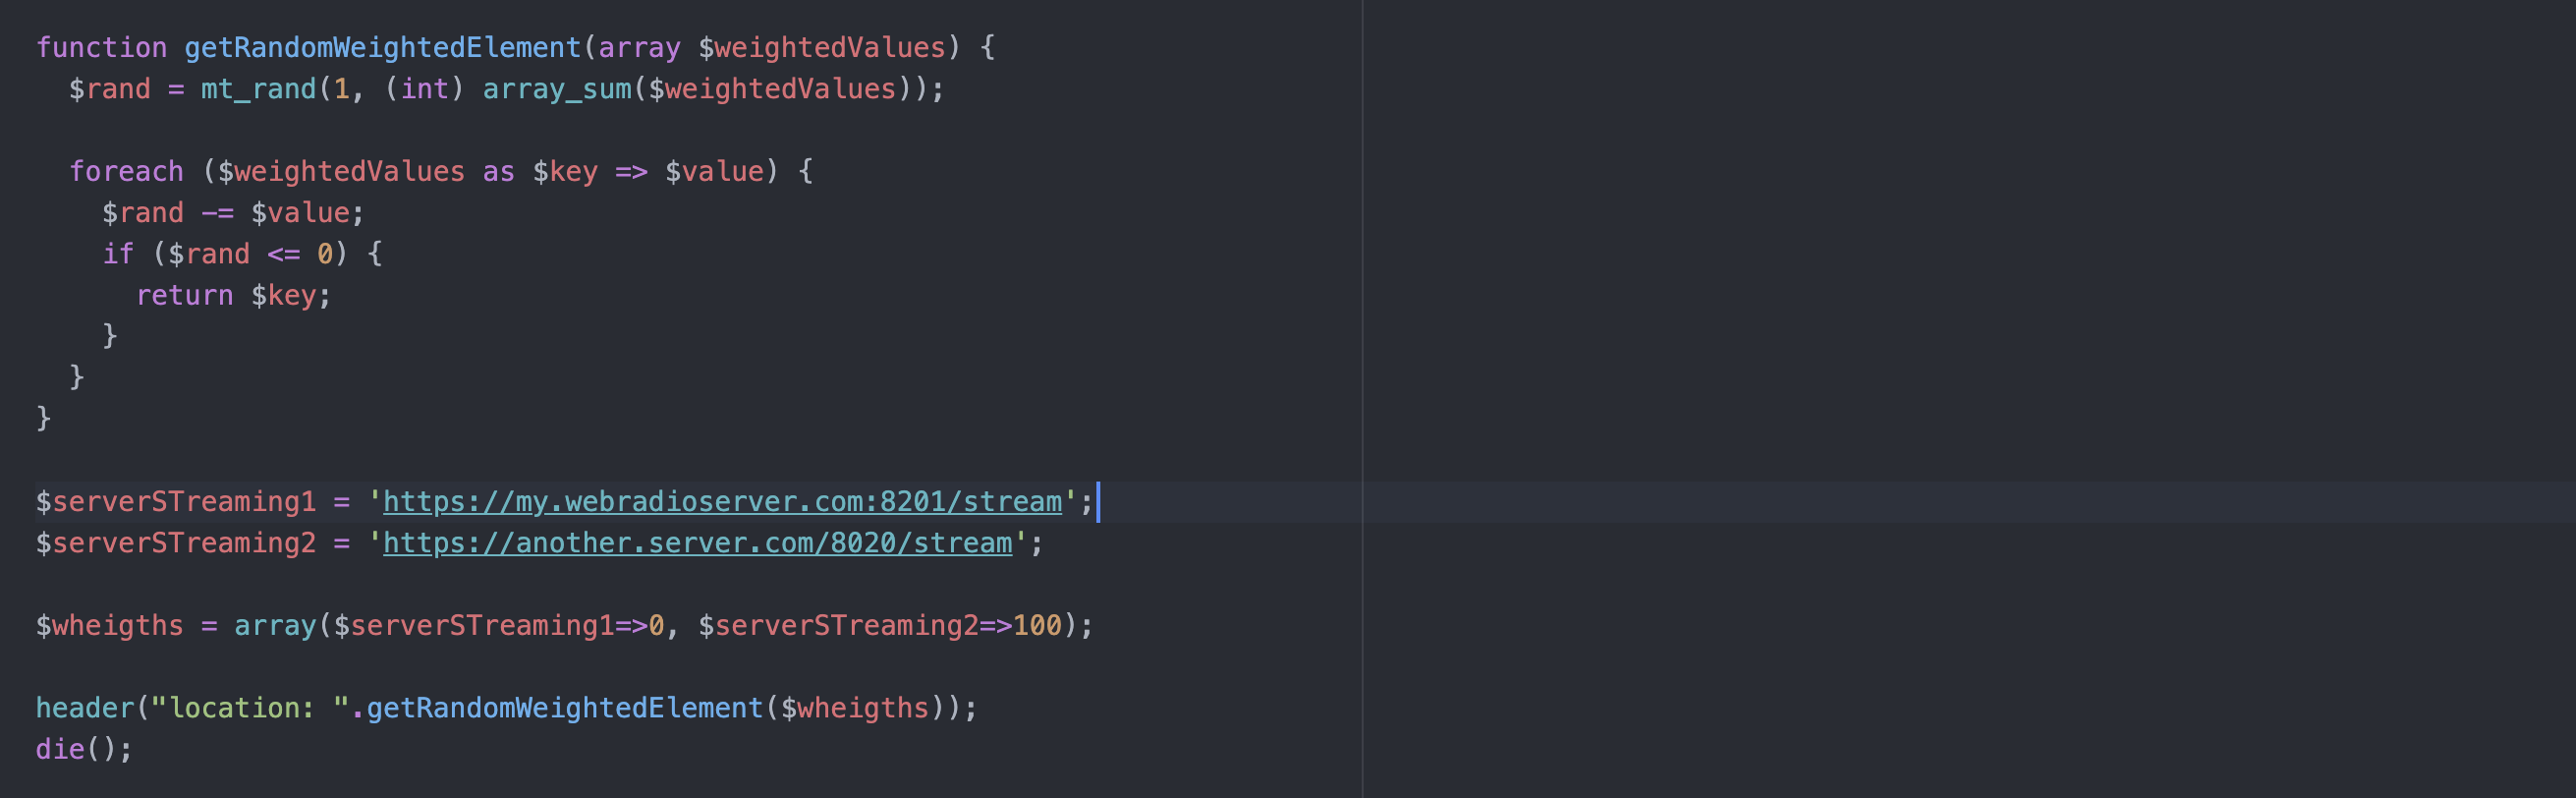
https://www.myradiowebsite.com/mystreaming --redirect to--> https://stream.thirdparty.org:8021/streamThis can be achieved in different ways: the simplest could probably be adding a rule in your .htaccess file (if you have an apache hosting) or a directive in ngnix configuration, if your hosting supports nginx. The redirect syntax is not covered in this post, you could probably find the right ones just by looking on the internet. I want to cover a slightly different solution that uses a programmatic approach. It’s a PHP redirect solution, but I know that this can be done with any other server-side language. More than having just a redirect, I’ve added the possibility of a random weighted redirect. The idea is that you can set up a redirect that is randomly distributed, so if you have 2 streaming service providers…
server1 = https://my.webradioserver.com:8201/stream
server2 = https://another.server.com/8020/stream
… you can then weigh for example set 50-50 so that a user could listen to server1 or to server2 with a 50% of probability. This gives you the chance to move to another server with a ramp up, or you can add another server to increase the possible listeners, and assign the user randomly . This is my solution:
<?php
header("Expires: on, 01 Jan 1970 00:00:00 GMT");
header("Last-Modified: " . gmdate("D, d M Y H:i:s") . " GMT");
header("Cache-Control: no-store, no-cache, must-revalidate");
header("Cache-Control: post-check=0, pre-check=0", false);
header("Pragma: no-cache");

function getRandomWeightedElement(array $weightedValues) {
   $rand = mt_rand(1, (int) array_sum($weightedValues));

   foreach ($weightedValues as $key => $value) {
      $rand -= $value;
      if ($rand <= 0) {
        return $key;
      }
   }
}

$serverSTreaming1 = 'https://my.webradioserver.com:8201/stream';
$serverSTreaming2 = 'https://another.server.com/8020/stream';

$wheights = array($serverSTreaming1=>0, $serverSTreaming2=>100);

header("location: ".getRandomWeightedElement($wheigths));
die();
The section$wheights = array($serverSTreaming1=>0, $serverSTreaming2=>100);
does all the magic: this setup moves all the traffic to streaming $serverSTreaming2, but you can of course configure it at 50-50 as well, for example with
$wheights = array($serverSTreaming1=>50, $serverSTreaming2=>50);
This solution could easily be extended with more streaming providers and different weights.
Giveaways
With a redirect solution, you can easily change your streaming provider to all your clients like your website, your mobile application, third party web site aggregators etc. because you use the source url and then only change the redirect destination.
You can add multiple sources and weigh them, as per my example.
Liked this article? Consider a donation! 
![]()

How to convert video for Playstation 3 / PS3
I know that downloading and converting video is an old-style procedure that, at the moment, it seems useless and time-consuming. But my PlayStation 3 still works like a charm and I can watch a movie while seating on the couch using the controller as a remote, so quite better than a computer on my legs connected to a streaming website.

A non-confortable position for watching movies
The problem is that the PS3, PlayStation 3, only plays some type of files and very often you need to convert downloaded files to a suitable format. After googling and looking around, I’ve finally found my perfect settings. First of all, you need to use ffmpeg to convert the file. ffmpeg is a super powerful tool that can do a lot of stuff with video and audio. We’ll use it to convert the input file into a format that can be played by PS3. Suppose you have a file named
INPUT_FILE_NAME.mkv(.mkv is a format that PS3 can not play) Then, to convert it just use this command:
ffmpeg -y -i "INPUT_FILE_NAME.mkv" -vf scale=1024:-2 -c:v libx264 -pix_fmt nv12 -acodec aac -b:a 192k -ac 2 -ar 44100 -af "aresample=async=1:min_hard_comp=0.100000:first_pts=0" -f mp4 "OUTPUT_FILE_NAME.mp4"If you hate dubbing (I know that are a lot of movie lovers that hate dubbing, I’m not one of them, to be honest) you can also put the subtitle that is (often) in the .mkv downloaded file, directly into the mp4 in output. Unfortunately, you can not disable it, but it’s a good trade-off.
In this case, use this command
ffmpeg -y -i "INPUT_FILE_NAME.mkv" -vf scale=1024:-2 -c:v libx264 -pix_fmt nv12 -vf subtitles="INPUT_FILE_NAME.mkv":si=0 -acodec aac -b:a 192k -ac 2 -ar 44100 -af "aresample=async=1:min_hard_comp=0.100000:first_pts=0" -f mp4 "OUTPUT_FILE_NAME.mp4" > /dev/null 2>&1 < /dev/null &Where I’ve just added the part
-vf subtitles="INPUT_FILE_NAME.mkv":si=0that basically tells ffmpeg to “get the subtitle from the input file, get the first subtitle track, number 0, and render them into the output file”. You can change the file name and, as long as ffmpeg can read the input file, you’ll have a file usable by your PS3. Another option I’ve added it’s the > /dev/null 2>&1 < /dev/null & at the end of the command so that it’ll run in background.
The first part > /dev/null 2>&1 basically tells ffmpeg to put any output to nowhere.
The second part < /dev/null tells ffmpeg that there is no interactive input (yes ffmpeg is an interactive tool!)…
… and the last part & means “run in background“!
Liked this article? Consider a donation! ![]()